Ubuntu; How to install on-premise Kubernetes using kubeadm
Table of Contents
System Prequisite #
sudo apt-get update
sudo apt-get install -y ca-certificates curl gnupg lsb-release apt-transport-https

# Edit or Create files

# /etc/modules-load.d/k8s.conf
overlay
br_netfilter

# /etc/sysctl.d/k8s.conf
net.bridge.bridge-nf-call-iptables  = 1
net.bridge.bridge-nf-call-ip6tables = 1
net.ipv4.ip_forward                 = 1

# apply
sudo sysctl --system

# check if its set to 1
sysctl net.bridge.bridge-nf-call-iptables net.bridge.bridge-nf-call-ip6tables net.ipv4.ip_forward

# if not
echo 1 | sudo tee /proc/sys/net/bridge/bridge-nf-call-iptables
echo 1 | sudo tee /proc/sys/net/bridge/bridge-nf-call-ip6tables


sudo ufw disable

sudo swapoff -a # temporary
sudo vim /etc/fstab # comment the line start with 'swap'
Install containerd #
# Add docker gpg key
curl -fsSL https://download.docker.com/linux/ubuntu/gpg | sudo gpg --dearmor -o /etc/apt/keyrings/docker-archive-keyring.gpg

# Add the appropriate Docker `apt` repository
echo \
  "deb [arch=$(dpkg --print-architecture) signed-by=/etc/apt/keyrings/docker-archive-keyring.gpg] https://download.docker.com/linux/ubuntu \
  $(lsb_release -cs) stable" | sudo tee /etc/apt/sources.list.d/docker.list > /dev/null

sudo apt update
sudo apt-get install containerd.io

sudo systemctl start containerd
sudo systemctl enable containerd

sudo containerd config default | sudo tee /etc/containerd/config.toml >> /dev/null
# edit /etc/containerd/config.toml
SystemdCgroup = true

sudo systemctl restart containerd
Install kubelet, kubeadm #
# If the directory `/etc/apt/keyrings` does not exist
# sudo mkdir -p -m 755 /etc/apt/keyrings
sudo curl -fsSL https://pkgs.k8s.io/core:/stable:/v1.29/deb/Release.key | sudo gpg --dearmor -o /etc/apt/keyrings/kubernetes-apt-keyring.gpg

# Add the appropriate Kubernetes `apt` repository
echo 'deb [signed-by=/etc/apt/keyrings/kubernetes-apt-keyring.gpg] https://pkgs.k8s.io/core:/stable:/v1.29/deb/ /' | sudo tee /etc/apt/sources.list.d/kubernetes.list

sudo apt update
sudo apt install kubelet
sudo systemctl start kubelet
sudo systemctl status kubelet

# if kubelet fail to start
# purge kubelet and
sudo rm -rf /lib/systemd/system/kubelet.service
sudo rm -rf /lib/systemd/system/kubelet.service.d
sudo apt install kubelet

sudo apt install kubeadm kubectl

# prevent auto update
sudo apt-mark hold kubelet kubeadm kubectl
Init Control-plane #
# control plane
sudo kubeadm init --node-name rika --pod-network-cidr='10.90.0.0/16' --apiserver-cert-extra-sans kube.jaehong21.com

# IMPORTANT: when endpoint is in domain name, must ensure that it is routed to the node (in my case, configure port-forwarding and DNS record before executing kubeadm)

sudo systemctl restart containerd
sudo systemctl restart kubelet

# to schedule pods also in control-plane
kubectl taint nodes --all node-role.kubernetes.io/control-plane-
Install CNI (Flannel) #
kubectl create ns kube-flannel
kubectl label --overwrite ns kube-flannel pod-security.kubernetes.io/enforce=privileged

helm repo add flannel https://flannel-io.github.io/flannel/
helm install flannel --set podCidr="10.90.0.0/16" --namespace kube-flannel flannel/flannel

sudo systemctl restart containerd
sudo systemctl restart kubelet # must be done
Install Argocd #
kubectl create ns argocd
# at argocd helm charts
helm dep update
helm install argocd -n argocd .

kubectl -n argocd get secret argocd-initial-admin-secret -o jsonpath="{.data.password}" | base64 -d
Join Worker node #
sudo kubeadm join <Control-plane IP>:6443 --token XXX \
	--discovery-token-ca-cert-hash XXX

sudo systemctl restart containerd
sudo systemctl restart kubelet
Configure Max allocatable pod count #
sudo systemctl status kubectl
sudo vim /lib/systemd/system/kubelet.service.d/10-kubeadm.conf

# add --max-pods=<int> after ExecStart
ExecStart=/usr/bin/kubelet $KUBELET_KUBECONFIG_ARGS $KUBELET_CONFIG_ARGS $KUBELET_KUBEADM_ARGS $KUBELET_EXTRA_ARGS --max-pods=255

sudo systemctl daemon-reload
sudo systemctl restart kubelet
Install helm #
curl https://baltocdn.com/helm/signing.asc | gpg --dearmor | sudo tee /etc/apt/keyrings/helm.gpg > /dev/null

sudo apt-get install apt-transport-https --yes
echo "deb [arch=$(dpkg --print-architecture) signed-by=/etc/apt/keyrings/helm.gpg] https://baltocdn.com/helm/stable/debian/ all main" | sudo tee /etc/apt/sources.list.d/helm-stable-debian.list
sudo apt-get update
sudo apt-get install helm
Install Nvidia #
Install nvidia-container-toolkit #
Reference:
- https://github.com/NVIDIA/k8s-device-plugin?tab=readme-ov-file#prerequisites
- https://docs.nvidia.com/datacenter/cloud-native/container-toolkit/latest/install-guide.html#installing-with-apt
- https://docs.nvidia.com/datacenter/cloud-native/container-toolkit/latest/install-guide.html#configuring-containerd-for-kubernetes
# check if nvidia driver is installed
nvidia-smi

# if not, install it
apt search nvidia-driver
sudo apt install nvidia-driver-550 # rika
sudo apt install nvidia-driver-530 # yuta

curl -fsSL https://nvidia.github.io/libnvidia-container/gpgkey | sudo gpg --dearmor -o /etc/apt/keyrings/nvidia-container-toolkit-keyring.gpg

curl -s -L https://nvidia.github.io/libnvidia-container/stable/deb/nvidia-container-toolkit.list | \
    sed 's#deb https://#deb [signed-by=/etc/apt/keyrings/nvidia-container-toolkit-keyring.gpg] https://#g' | \
    sudo tee /etc/apt/sources.list.d/nvidia-container-toolkit.list

sudo apt-get update
sudo apt-get install -y nvidia-container-toolkit
# edit /etc/containerd/config.toml in host
sudo nvidia-ctk runtime configure --runtime=containerd

# change default_runtime_name "runc" to "nvidia"
[plugins."io.containerd.grpc.v1.cri".containerd]
	default_runtime_name = "nvidia"

sudo systemctl restart containerd
Install nvidia-gpu-operator #
Reference:
- https://docs.nvidia.com/datacenter/cloud-native/gpu-operator/latest/gpu-sharing.html
- https://medium.com/@api.test9989/gpu-%EC%AA%BC%EA%B0%9C%EA%B8%B0-time-slicing-acbf5fffb16e
- https://medium.com/@api.test9989/%ED%99%88%EC%84%9C%EB%B2%84-%ED%81%B4%EB%9F%AC%EC%8A%A4%ED%84%B0%EB%A7%81%ED%95%98%EA%B8%B0-2-gpu%EB%85%B8%EB%93%9C-%EC%B6%94%EA%B0%80-28d12424bee3
k8s-device-plugin makes gpu instance allocate to k8s pods, but one pods for one GPU, which can be inefficient. Bellow nvidia’s gpu operator have its own devicep-plugin, and also make time slicing possible for GPUs.
# Chart.yaml
# nvidia-gpu-operator

apiVersion: v2
name: nvidia-gpu-operator
description: A Helm chart for Kubernetes
type: application
version: 0.1.0
dependencies:
  - name: gpu-operator
    alias: nvidia-gpu-operator
    version: v24.3.0
    repository: https://nvidia.github.io/gpu-operator
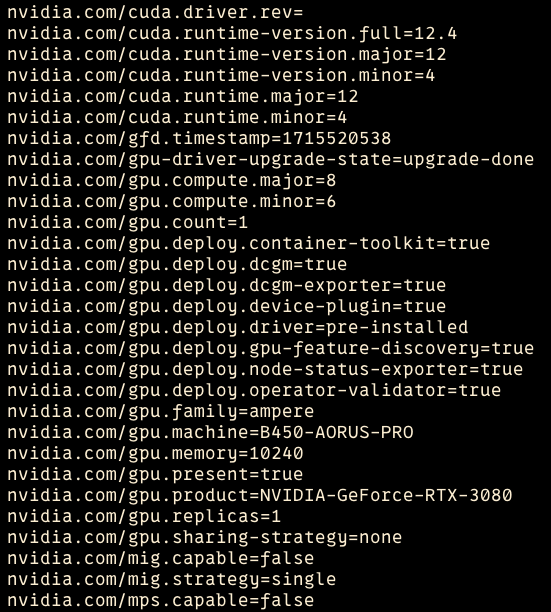
When every pods are Ready from gpu-operator, check its nodes whether its label is added by nvidia-gpu-operator like below

In my case, I have two nodes with one nvidia GPU each. node: rika has nvidia.com/gpu.product=NVIDIA-GeForce-RTX-3080 and node: yuta has nvidia.com/gpu.product=NVIDIA-GeForce-RTX-3060-Ti.
apiVersion: v1
kind: Pod
metadata:
  name: nbody-gpu-benchmark
  namespace: default
spec:
  restartPolicy: OnFailure
  containers:
    - name: cuda-container
      image: nvcr.io/nvidia/k8s/cuda-sample:nbody
      args: ["nbody", "-gpu", "-benchmark"]
      resources:
        requests:
          nvidia.com/gpu: 1
        limits:
          nvidia.com/gpu: 1
      env:
        - name: NVIDIA_VISIBLE_DEVICES
          value: all
        - name: NVIDIA_DRIVER_CAPABILITIES
          value: all
Run "nbody -benchmark [-numbodies=<numBodies>]" to measure performance.
    -fullscreen       (run n-body simulation in fullscreen mode)
    -fp64             (use double precision floating point values for simulation)
    -hostmem          (stores simulation data in host memory)
    -benchmark        (run benchmark to measure performance)
    -numbodies=<N>    (number of bodies (>= 1) to run in simulation)
    -device=<d>       (where d=0,1,2.... for the CUDA device to use)
    -numdevices=<i>   (where i=(number of CUDA devices > 0) to use for simulation)
    -compare          (compares simulation results running once on the default GPU and once on the CPU)
    -cpu              (run n-body simulation on the CPU)
    -tipsy=<file.bin> (load a tipsy model file for simulation)

NOTE: The CUDA Samples are not meant for performance measurements. Results may vary when GPU Boost is enabled.

> Windowed mode
> Simulation data stored in video memory
> Single precision floating point simulation
> 1 Devices used for simulation
GPU Device 0: "Ampere" with compute capability 8.6

> Compute 8.6 CUDA device: [NVIDIA GeForce RTX 3080]
69632 bodies, total time for 10 iterations: 56.775 ms
= 854.011 billion interactions per second
= 17080.211 single-precision GFLOP/s at 20 flops per interaction
Stream closed EOF for default/nbody-gpu-benchmark (cuda-container)
default time-slicing-config.yaml #
apiVersion: v1
kind: ConfigMap
metadata:
name: time-slicing-config-all
data:
any: |-
  version: v1
  flags:
    migStrategy: none
  sharing:
    timeSlicing:
    renameByDefault: false
      resources:
      - name: nvidia.com/gpu
        replicas: 6
kubectl create -n nvidia-gpu-operator -f time-slicing-config-all.yaml

kubectl patch clusterpolicies.nvidia.com/cluster-policy \
    -n nvidia-gpu-operator --type merge \
    -p '{"spec": {"devicePlugin": {"config": {"name": "time-slicing-config-all", "default": "any"}}}}'

# Confirm that the `gpu-feature-discovery` and `nvidia-device-plugin-daemonset` pods restart.

kubectl get events -n nvidia-gpu-operator --sort-by='.lastTimestamp'
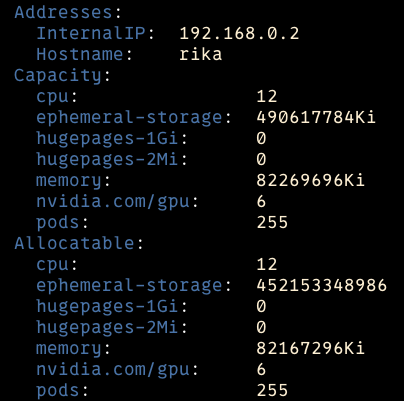
Now you can check your node’s info that Capacity of nvidia.com/gpu have changed.

apiVersion: v1
kind: Pod
metadata:
  name: nvidia-smi-a
spec:
  containers:
    - name: ubuntu
      image: ubuntu:20.04
      imagePullPolicy: IfNotPresent
      command:
        - "/bin/sleep"
        - "3650d"
      resources:
        requests:
          nvidia.com/gpu: 5
        limits:
          nvidia.com/gpu: 5
---
apiVersion: v1
kind: Pod
metadata:
  name: nvidia-smi-b
spec:
  containers:
    - name: ubuntu
      image: ubuntu:20.04
      imagePullPolicy: IfNotPresent
      command:
        - "/bin/sleep"
        - "3650d"
      resources:
        requests:
          nvidia.com/gpu: 5
        limits:
          nvidia.com/gpu: 5
I only have 2 GPUs in my kuberenetes cluster, but above yaml file works and as total time sliced gpu is now 12. One pod prints RTX 3080 for nvidia-smi inside the pod, while the other prints out 3060 Ti whcich is my other GPU product.
! Important:
nvidia.com/gpucannot exceed the number ofnvidia.com/gpufrom Node.
In other words, even now the total time sliced gpu is 12(6 X 2) the nvidia.com/gpu cannot be greater than 6 and less than 12. nvida.com/gpu’s count is calculated with $\text{nvidia.com/gpu.count} \times \text{nvidia.com/gpu.replicas}$
...
Labels:
                  nvidia.com/gpu.count=4
                  nvidia.com/gpu.product=Tesla-T4-SHARED
                  nvidia.com/gpu.replicas=4
Capacity:
  nvidia.com/gpu: 16
  ...
Allocatable:
  nvidia.com/gpu: 16
  ...
Update time-slicing configmap #
The Operator does not monitor the time-slicing config maps. As a result, if you modify a config map, the device plugin pods do not restart and do not apply the modified configuration.
kubectl rollout restart -n nvidia-gpu-operator daemonset/nvidia-device-plugin-daemonset
Install Docker #
# Add docker gpg key
curl -fsSL https://download.docker.com/linux/ubuntu/gpg | sudo gpg --dearmor -o /etc/apt/keyrings/docker-archive-keyring.gpg

# Add the appropriate Docker `apt` repository
echo \
  "deb [arch=$(dpkg --print-architecture) signed-by=/etc/apt/keyrings/docker-archive-keyring.gpg] https://download.docker.com/linux/ubuntu \
  $(lsb_release -cs) stable" | sudo tee /etc/apt/sources.list.d/docker.list > /dev/null

sudo rm -rf /var/lib/docker
sudo rm -rf /var/run/docker.sock
# sudo apt-get install containerd.io
sudo apt-get install docker-ce docker-ce-cli
sudo apt-get install docker-compose

sudo systemctl restart docker

sudo usermod -aG docker $USER
newgrp docker
Configure containerd registry #
Reference: https://github.com/containerd/containerd/blob/main/docs/cri/registry.md
# need explicit version
version = 2

[plugins."io.containerd.grpc.v1.cri".registry.configs]
  # The registry host has to be a domain name or IP. Port number is also
  # needed if the default HTTPS or HTTP port is not used.
  [plugins."io.containerd.grpc.v1.cri".registry.configs."gcr.io".auth]
    username = ""
    password = ""
    auth = ""
    identitytoken = ""
[plugins."io.containerd.grpc.v1.cri".registry.configs."gitea.jaehong21.com".auth]
    username = ""
    password = ""
# restart containerd needed
sudo systemctl restart containerd
Troubleshooting #
Too many open files for fs.inotify to start kubelet #
Inotify (inode notify) is a Linux kernel subsystem that provides a mechanism for monitoring changes to filesystems. It is often used by programs to watch for changes in directories or specific files.
fs.inotify.max_user_instances: This parameter controls the maximum number of inotify instances per user. Each instance can be used to monitor multiple files or directories.fs.inotify.max_user_watches: This parameter controls the maximum number of files a user can monitor using inotify. Each watch corresponds to a single file or directory being monitored.
Adjusting these parameters can be necessary for applications that need to monitor a large number of files, such as file synchronization services, development environments, or log monitoring tools.
Reference:
# It is 10x previous values
sudo sysctl fs.inotify.max_user_instances=1280
sudo sysctl fs.inotify.max_user_watches=655360

# Check current value
sysctl fs.inotify

# To persist this settings after reboot
sudo vim /etc/sysctl.d/99-inotify.conf

# /etc/sysctl.d/99-inotify.conf
fs.inotify.max_user_instances=1280
fs.inotify.max_user_watches=655360

# Apply
sudo sysctl --system
Reference: #
- https://velog.io/@fill0006/Ubuntu-22.04-%EC%BF%A0%EB%B2%84%EB%84%A4%ED%8B%B0%EC%8A%A4-%EC%84%A4%EC%B9%98%ED%95%98%EA%B8%B0
- https://v1-29.docs.kubernetes.io/docs/setup/production-environment/tools/kubeadm/install-kubeadm/#installing-kubeadm-kubelet-and-kubectl
- https://showinfo8.com/2023/07/26/ubuntu-22-04%EC%97%90%EC%84%9C-kubernets-%EC%84%A4%EC%B9%98%ED%95%98%EA%B8%B0/
- https://kubernetes.io/docs/reference/setup-tools/kubeadm/kubeadm-init/