What is NAT instance?

Table of Contents
Introduction #
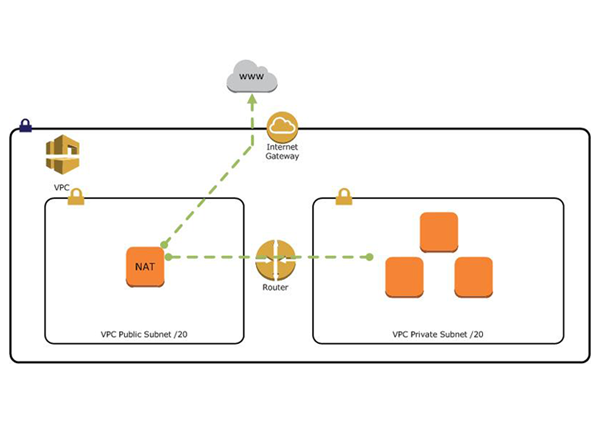
According to Bastion Host, now we can compose public and private subnets and can access to private instance using Bastion Host. However, when private instances want to download some content from public internet, there is to communicate. So, we create NAT Gateway on public subnet t communicate with Internet Gateway, then private instance can go through NAT Gateway to access public internet.
NAT Gateway #
resource "aws_eip" "default_nat_gateway_static_ip" {
  vpc = true
  lifecycle {
    create_before_destroy = true
  }
}
resource "aws_nat_gateway" "default_nat_gateway" {
  allocation_id = aws_eip.default_nat_gateway_static_ip.id
  subnet_id = aws_subnet.public_subnet.id
  tags = {
    Name = "NAT-Gateway"
  }
}

# add nat_gateway to private_route_table
resource "aws_route" "nat_gateway_association" {
  route_table_id = aws_route_table.private_route_table.id
  destination_cidr_block = "0.0.0.0/0"
  nat_gateway_id = aws_nat_gateway.default_nat_gateway.id
}
NAT Instance #

AWS provides NAT Gateway service which is simple and automatically scalable. However, it’s monthly cost can be quite pressure for individual to use. So, it is also possible to create NAT instance rather than NAT Gateway (According to AWS Docs, NAT Gateway is recommended rather than NAT instance).
resource "aws_security_group" "nat_instance_security_group" {
  name       = "nat_instance_security_group"
  description = "Allow all traffic"
  vpc_id      = aws_vpc.default_vpc.id

  ingress {
    description = "Allow SSH"
    from_port   = 22
    to_port     = 22
    protocol    = "tcp"
    cidr_blocks = ["0.0.0.0/0"]
  }
  ingress {
    description = "Allow HTTP in private subnet"
    from_port   = 80
    to_port     = 80
    protocol    = "tcp"
    cidr_blocks = [aws_subnet.private_subnet.cidr_block]
  }
  ingress {
    description = "Allow HTTPS in private subnet"
    from_port   = 443
    to_port     = 443
    protocol    = "tcp"
    cidr_blocks = [aws_subnet.private_subnet.cidr_block]
  }
  egress {
    from_port   = 80
    to_port     = 80
    protocol    = "tcp"
    cidr_blocks = ["0.0.0.0/0"]
  }
  egress {
    from_port   = 443
    to_port     = 443
    protocol    = "tcp"
    cidr_blocks = ["0.0.0.0/0"]
  }
}

resource "aws_instance" "nat_instance" {
  # Linux Image for NAT instance
  ami = "ami-0abd4c49376ea5dbb"
  instance_type = "t2.micro"
  key_name      = aws_key_pair.vpn_key.key_name
  network_interface {
    device_index = 0
    network_interface_id = aws_network_interface.nat_instance_network_interface.id
  }
  tags = {
    Name = "nat_instance"
  }
}
resource "aws_network_interface" "nat_instance_network_interface" {
  subnet_id = aws_subnet.public_subnet.id
  security_groups = [aws_security_group.nat_instance_security_group.id]
  # need to set false to set instance to NAT instance
  source_dest_check = false
  tags = {
    Name = "nat_instance_network_interface"
  }
}

# allocate Elasitc IP for NAT instance
resource "aws_eip" "nat_instance_static_ip" {
  instance = aws_instance.nat_instance.id
  network_interface = aws_network_interface.nat_instance_network_interface.id
  vpc = true
}
To set a NAT Instance, there are several settings to go through. But, by using AMI(Amazon Machine Image) for NAT instance specific, we can skip those steps. Also, instance’s source_dest_check must be false. source/destination check guarantees the traffic’s source or destination must be its instance. However, a NAT instance must be able to send and receive traffic when the source or destination is not itself.
Finally, add NAT instance’s ENI(Elastic Network Interface) to private_route_table.
resource "aws_route" "nat_instance_association" {
  route_table_id = aws_route_table.private_route_table.id
  destination_cidr_block = "0.0.0.0/0"
  network_interface_id =
	  aws_network_interface.nat_instance_network_interface.id
  # instance_id = aws_instance.nat_instance.id
}