[K3s-06] How to create an actually safe secrets for GitOps
Table of Contents
Anyone who knows a little about kubernetes will know that kuberenetes secrets are not actually safe. It is just base64 encoded. So, it is not safe to store on git or expose it to the public. There are some ways to make it safe. In this post, I will introduce the very most simple way to handle it.
Some candidates for securing kubernetes secrets
- Sealed Secrets
- External Secrets Operator (e.g. Hashicorp Vault)
Sealed Secret #
How kubeseal works #
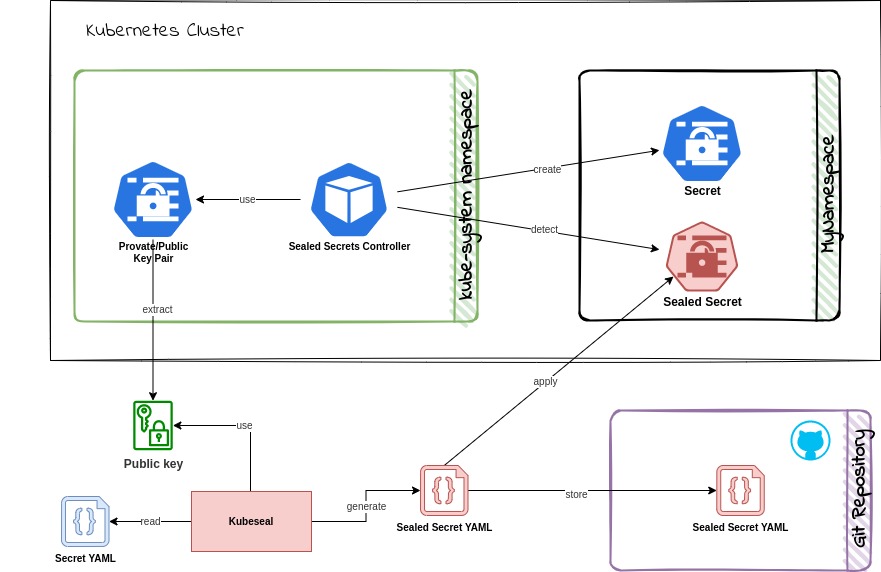
How sealed secret or kubeseal works is very straightforward. I won’t explain what public key encryption in detail in this post, but to be simple for understanding, it is just encrypting the secret with public key and decrypting it with private key.
You encrypt the kubernetes secret value with the public key you receive through kubeseal, and corresponding private key is stored in the cluster. Through Sealed Secret Controller installed in the cluster, it will be decrypted with the private key and stored in the cluster. So, you can use it as a normal secret in the cluster. In other words, if you have the direct access to the cluster, you can still just read the secret value.
How to configure kubeseal #
Install kubeseal command: https://github.com/bitnami-labs/sealed-secrets#kubeseal
# Install, kubeseal controller on k3s
helm repo add sealed-secrets https://bitnami-labs.github.io/sealed-secrets
helm repo update

helm install sealed-secrets -n kube-system --set-string fullnameOverride=sealed-secrets-controller sealed-secrets/sealed-secrets

helm status -n kube-system sealed-secrets
First, let’s create an example secret with kubectl command, with value below, and create an file named mysecret-1.yaml.
- dbpassword: password
- secondkey: secondValue
- thirdkey: thirdValue
kubectl create secret generic mysecret-1 --dry-run=client --from-literal=dbpassword=password --from-literal=secondkey=secondValue --from-literal=thirdkey=thirdValue -o yaml > mysecret-1.yaml
When using kubeseal command, it must be the environment with kubectl master. Then, it will fetch the certificate(public key) for encryption and export with sealed secret yaml file.
kubeseal --controller-name=sealed-secrets-controller --controller-namespace=kube-system --format yaml --secret-file mysecret-1.yaml --sealed-secret-file mysealedsecret-1.yaml
In other way, you can also extract public key from cluster and store it locally. When the parameter --cert mycert.pem is added to the command kubeseal, it is denoting to use the local certificate for encryption.
# install certificate
kubeseal \
      --controller-name=sealed-secrets-controller \
      --controller-namespace=kube-system \
      --fetch-cert > mycert.pem

# encrypt using mycert.pem
kubeseal \
	  --controller-name=sealed-secrets-controller \
	  --controller-namespace=kube-system \
	  --secret-file mysecret-1.yaml \
	  --format yaml --cert mycert.pem > mysealedsecret-1.yaml
Created encrypted mysealedsecret-1.yaml file will be like below. As it is encrypted, it is not possible to decode it with base64, and also safe to store on git.
---
apiVersion: bitnami.com/v1alpha1
kind: SealedSecret
metadata:
  creationTimestamp: null
  name: mysecret-1
  namespace: default
spec:
  encryptedData:
    dbpassword: AgBpKKeEP7xHvP1oj/5Bc/6kzCTf91+xBl+LzZLsTrzwKkwDIXE2nuCRt/eSeSl04CvD8EOiZsmlPemZ3dbN6JXrLtilYdSL/QDWv0/6ijGfce5NC+zneGFrY+f9skqJWzhG4hQcwGvwJ/NpEO5TlPy9DVEmhXHouAK7/jSZMzO60GVP+dNgMAIknXWZFx4oVk9wbVUmmTCJG/LdFAaNCNxKtpVc1NCr6PxPE9pugroZ3BtpsAwdd7juDHYWqyVw9MW+fWNOw9ZRcScpxX1LXc5vQS9o3CuZpKTsJXe/fGxRAl9gsa+QOXK1bp2Yh7ODhCJBpM6GW7kxOncspn/O0ATiKoq4M3HiXOmsE6pJWx6K5cesW5Tf1/BGUMzkba8cglEo3GrP9acVot59+oT0mwNLnArPygR0ZRQyLX4e+eFv3rkKFm7Z2wFq+5YrATZ+LO/0qTzbdztk/iUwcLXg4kPK3df8vZlw36wsQ175jo33alkI+B6XwBvSjJVlK9nWTp5Bz4dthbEvsU8Jm78FMspF/6uxoF/Sa8Rf0u473aJawRAUYuBvw7Ay3y6K9WhIkf814Yenw4gYIQ+O+zHEbCT+0gTNWttApEqqBTPwLQtorhjnJUCmDQxECbuzUxehoO/948xTEULu6f+sC5IBbkPM9KNY3hu+f39DfRC6+M44QKaiUzyE8FXgt2D7xgvB0UTCzRSXpj55FQ==
    secondkey: AgAdg/xWDmTWfT11DdAbMvD19R9/tCL96P1iAws/0+KZaTVEc4+yuZrCHqgIwoc4fbkIOl9n9lzYn7CuRcptt9s+zXUHg/7RR22XHUmS0TuLmjv1mnqdVST3L2BZfBzLb6tXy0SVPFohe+c9G6UbOavMNrELhTYd1RMqicg88kGSVb5vp4kOUQ6E9DLEls/G9O8WyoQSowqVK5tA0vPSMjdTjV7fcfaaiR1a4uKSxUWvLf+eloEOWTsW3bPW06YwQ6hkLNX/hlQ2/NpOih0OxhOr8FqKfBTlHfri6xzPXQ38qXSvZFjDCYdCFQ7R7InW1jJWoqISNMHG5NK77G33wCaQ2Zp+k12d8YWBh/lWNoLTIzO560HvRUr414KtSOMnxg+HEZgkLMUWus/JULVMB8lCtk+5eXHuhFIwM9s4pCCbQBobv9Jltm+Og5ppTk/LFQLAUoLqQyMQVmaz4ugV/peiXAT5jw4T5aIwqS9AQx/kiUD5b+1mXSapl1lsyEypCkTNjkGpAleRJUvzjU66nRV/nJBLdNT23c1sFgJ9ZJZ3IAb9MBGi6ix62qlN1FEQsXLMEckX99jDKw2dpZJNQyERwNOB9CzkjM4cYAsjXqCYfAS7rsHin+VybZKcez3wkPKl9PXswEzqjOfTbVS8fISU7ZvWn4rRqC9Yrcg7JWC0Abv+f2yO8x524fw/hGTvJ4SubQe6HD+H9Md7yg==
    thirdkey: AgB0BNkNJ6Iop5GEUTkFs7G7WberMH6EKzvjcbb4KaSMcTA0vR093srJueifK81ZJoKDqlJJQJoETrcmopZhRATW9xMx+ANYPcWhvthNMEYfPSENgvUHtRR7rJHhfkwGfWfWdrGV1WYz61uLSHL6gxAOa4NNiWF373VX52NyT9EZAFIjSw1M2BKW9C0kJ+MO5ziDstkfYx8a0VJfvLJ5s4bKhj86SNAWPisCgRzUCCbQfIKBS1w7XTU5jTDISdnnmVVOqb4icqLBxi6TNKhDeCqGJtOcwMNVh36H5nNub/1GW64uNvnHGpP1tNbI3MlsBGJ3FNkoR18GKTKIgrQwatQzTKJZdILzo7WCtnn+SwwXbKS54wPTqGX3ZQak/l3kbqlkJixWOEIz4EF6UbsLuldFlZFy32HBdVO8+Nurb8b4bXVapEef6Ik739ykKKMzFioxuEnp3BZjKUNbKfvoDdH3+gpObF0FmKRFMB2AU+OZZV2aaJHBMR0C3nrGyKDvbvlt7J0IIwgrd/RaOTZas+mLAKY5DXMuy9S8nvWyF2C7asntbnmpjI3YZ46LGiDEYihexJUpcJTHyIMQ2hpKGKNxR9RIZf4AUvz4T6Osn+vIbd0slos7aibiObDY2e8iVjfVtUPGe6HsOh4BJ1mc/YL3+0App8EV6FIxxe4fo+nchUff8iKA44RrRDf5MSvQFFQhptmwvk16JM9t
  template:
    metadata:
      creationTimestamp: null
      name: mysecret-1
      namespace: default
Then, finally create secrets into the cluster.
kubectl create -f mysealedsecret-1.yaml
+) or you can create an sealed secret in one command like below
kubectl create secret generic mysecret-1 --namespace=default --dry-run=client --from-literal=dbpassword=password --from-literal=secondkey=secondValue --from-literal=thirdkey=thirdValue -o yaml | \
    kubeseal \
      --controller-name=sealed-secrets-controller \
      --controller-namespace=kube-system \
      --format yaml > mysealedsecret-1.yaml

# you can check decrypted secret also
kubectl get secret mysecret-1 -o yaml
Sealed secret can be uploaded to Git, as it is encrypted. And when it is created to the k3s, it will be created as normal secret with base64 encoded as usual. Obviously, can be decoded in base64 also when you have direct access to the kubernetes cluster. Existing secrets can be injected in spec.containers.envFrom.secretRef in theDeployments.
Vault #
How Vault works (WIP) #
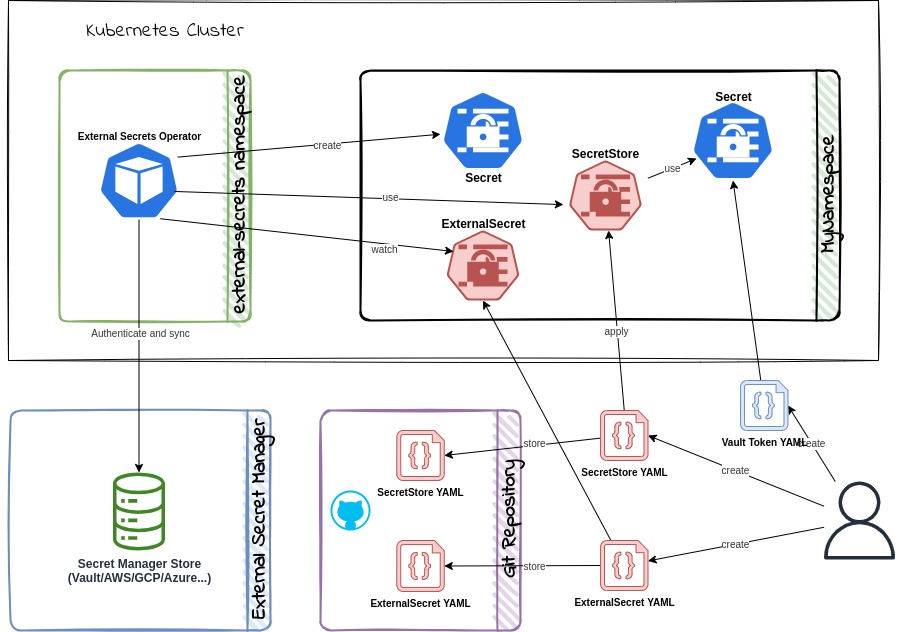
Using External Secrets Operator(ESO) is even better way to store secrets in cluster. The most well known example is using Hashicorp Vault.
ESO provides four CRDs to manage secrets. The ExternalSecret and ClusterExternalSecret CRD define what data needs to be fetched and how it should be transformed. The SecretStore and ClusterSecretStore CRD define the connection details to the external secret stores.
It works as below;
- Create a SecretStore CRD to define the connection details to the external secret store.
- Create secrets in the external secret store.
- Create an ExternalSecret CRD to define what data needs to be fetched from the external secret store.
- Deploy the CRDs to the target cluster.
- The ESO controller will fetch the data from the external secret store and create a Kubernetes secret.
For how exactly Vault works as kubernetes secret injector, it needs much more detailed explanation. I will update this section when I have some extra time.
How to configure Vault (WIP) #
Also for configuration of Vault, it’s still work on progress.